Java Tutorial #1: Introduction and Setup Guide for Beginners
March 16, 2026
Java is a widely used programming language that has been shaping the software world for over two decades. It was originally developed by Sun Microsystems in 1995 and is now maintained by Oracle Corporation. The language was created to be simple, reliable, and portable, allowing developers to build programs that can run on different devices and operating systems without modification. This portability and versatility quickly made Java popular for both small projects and large enterprise applications.
Over the years, Java has grown into one of the most popular languages globally, powering everything from Android apps to web applications, server-side systems, and even scientific computing. Its popularity comes from a combination of readability, performance, and security. This programming language also has a strong developer community, extensive libraries, and frameworks that make it easy to learn and use, even for beginners.
In this tutorial, we will guide you through the basics of Java, explain its key components like JDK, JRE, and JVM, set up your development environment, and write your first program, giving you a solid foundation to start your journey in Java programming.
Table of Contents
What is Java?
Because its syntax is structured and relatively easy to read, Java is often recommended as one of the first programming languages for beginners who want to learn how software is built. Another reason developers choose this language is its ability to run on different operating systems without major changes to the program. A Java application written on one system can usually run on others such as Windows, macOS, or Linux. Along with this flexibility, this language provides a large collection of libraries and development tools that help programmers build applications more efficiently and maintain them more easily over time.
Key Characteristics of Java
To understand why Java is widely used in the software industry, it is helpful to look at some of the key characteristics of the language.
1. Simple
It is designed to be easy to read and understand. Its syntax is organized and consistent, which helps beginners learn programming concepts more quickly.
2. Object-Oriented
Java organizes programs using classes and objects. This approach helps developers structure code into smaller, reusable components, making programs easier to build and manage.
3. Platform Independent
Java programs can run on different operating systems without needing to rewrite the entire program. This makes it easier to develop applications that work across multiple environments.
4. Secure
The language includes built-in security features that help protect programs from certain types of errors and unwanted access, which is important for applications that handle sensitive data.
5. Robust
Java is designed to help developers create stable programs. It includes features that detect errors during development and mechanisms that help handle problems while the program is running, reducing the chances of unexpected crashes.
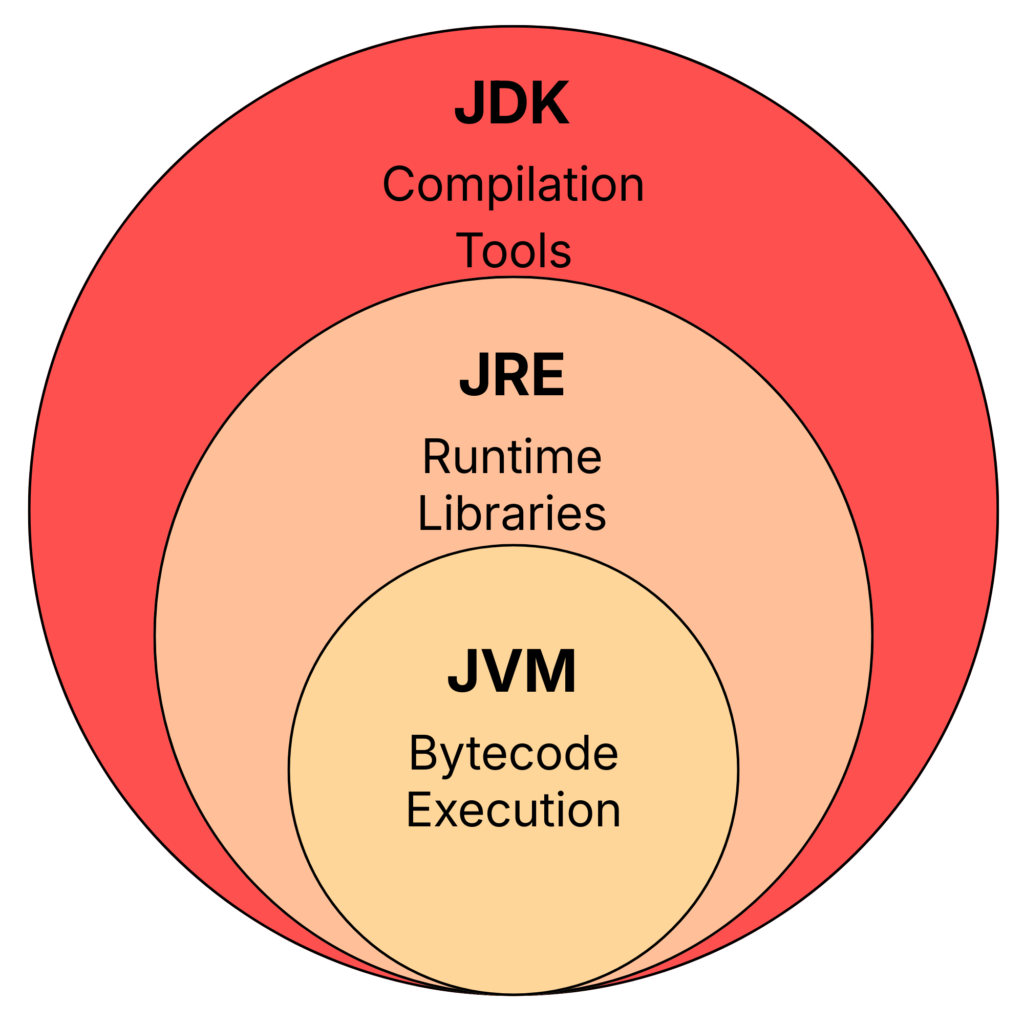
Understanding JDK, JRE, and JVM
Although beginners often see these terms together, each of them serves a different purpose:
1. JVM (Java Virtual Machine)
Because the JVM acts as an execution environment for Java programs, the same compiled program can run on different operating systems as long as a compatible JVM is available.
2. JRE (Java Runtime Environment)
The Java Runtime Environment (JRE) provides everything required to run Java applications. It includes the JVM along with a set of standard libraries and supporting files that Java programs depend on during execution.
However, the JRE does not include development tools such as compilers. Its primary purpose is to allow users to run Java applications rather than develop them.
3. JDK (Java Development Kit)
The Java Development Kit (JDK) is the complete toolkit used for developing Java applications. It includes the JRE and additional development tools that programmers use to write, compile, and test Java programs.
One of the most important tools included in the JDK is the javac compiler, which converts source code (.java files) into bytecode (.class files) that the JVM can execute.
Setting Up Java on Your Computer
To begin programming in Java, your system needs the Java Development Kit (JDK). The JDK is available for major operating systems such as Windows, macOS, and Linux. Installing it prepares your computer to compile Java source files (.java) into bytecode (.class) and execute them when needed.
You can download the latest version of the JDK from the official Java website.
Download JDK: Click Here
Once downloaded, follow the installation instructions provided on the website for your operating system. After installation is complete, the next step is to verify that Java has been correctly installed on your system.
Verifying the Java Installation
Open Command Prompt (Windows) or Terminal (macOS/Linux) and run the following commands:
java -version
javac -versionSeeing version information for both commands indicates that your system is ready to compile and run Java programs.
Choosing an IDE for Java Development
Java programs can be written using a simple text editor, but most developers prefer working with an Integrated Development Environment (IDE). An IDE provides tools that make development easier and more efficient, such as syntax highlighting, intelligent code suggestions, debugging tools, and built-in project management features.
Using an IDE is not strictly required, but it significantly simplifies the process of writing, running, and organizing the programs, especially for beginners who are learning the language for the first time.
Some widely used tools include:
IntelliJ IDEA (Community Edition):
A modern and powerful IDE widely used by Java developers. It provides strong code assistance features and an intuitive interface, making it a popular choice for beginners and professionals alike.
Download: IntelliJ IDEA
Eclipse IDE:
A long-standing open-source IDE that supports Java development and offers a large ecosystem of plugins. It is widely used in enterprise environments.
Download: Eclipse IDE
Apache NetBeans:
An open-source IDE that provides built-in tools for Java development and project management. It is known for its simplicity and straightforward setup process.
Download: Apache NetBeans
Visual Studio Code:
A lightweight and highly customizable code editor that can support Java development through extensions. By installing the Java Extension Pack, developers can add features such as code completion, debugging tools, and project management capabilities.
Download: Visual Studio Code
For beginners, IntelliJ IDEA Community Edition is often recommended because it provides a well-integrated Java development experience with minimal setup. However, the choice of tool ultimately depends on personal preference, and any of the options listed above can be used to develop Java applications.
Writing Your First Java Program
Create a new Java file named HelloWorld.java and add the following code:
public class Hello{
    public static void main(String[] args){
        System.out.println("Hello World");
    }
}
This program prints a short message to the console. Although it is simple, it introduces several important concepts in Java.
Understanding The Code
Let’s briefly look at the key terms used in this program:
public: This is an access modifier that allows the class or method to be accessible from other parts of the program.
class: A class is a blueprint used to create objects and organize code.
HelloWorld: This is the name of the class. In Java, the class name must match the file name.
static: This keyword allows the method to run without creating an object of the class.
void: This indicates that the method does not return any value.
main: This is the main method where the execution of every Java program begins.
String[] args: This represents command-line arguments that can be passed to the program when it runs.
System.out.println(): This is a built-in method used to print output to the console.
You can run this program using your IDE, or compile and execute it through the terminal using:
javac HelloWorld.java
java HelloWorld
If everything has been set up correctly, the program will display:
Hello, World!
Running this program successfully confirms that your Java environment is working and that you are ready to begin learning the core concepts of Java programming.
In the upcoming tutorials of this series, we will explore these concepts in much greater detail, including classes, methods, variables, data types, and program structure, helping you build a strong foundation in Java development.
Wrapping Up
In this tutorial, you learned the basics needed to get started with Java. We introduced the language, discussed its key characteristics, explored the roles of JDK, JRE, and JVM, and set up a working Java development environment. You also wrote and ran your first program, which is an important first step in understanding how Java applications work.
This post is just the starting point of the Java tutorial series. In the upcoming tutorials, we will gradually explore core programming concepts such as variables, data types, operators, control flow statements, methods, and object-oriented programming. If you are new to programming, try experimenting with the example program and become comfortable running Java code on your system.